Saturday, November 7, 2009
- basically consists of a variety of functions or procedures that an application program
can call upon, as well as data structures, constants, and
various definitions needed to describe system resources.
- Applications programs use the API by including calls to routines in a program library
- For example, this simple function puts a message box on the screen:
MessageBox (0, “Program Initialization Failed!”,
“Error!”, MB_ICONEXCLAMATION | MB_OK | MB_
SYSTEMMODAL);
- API for a major operating system such as Windows contains hundreds of functions, data structures,and definitions.
- In order to simplify learning to access the
necessary functions and to promote the writing of readable
code, compiler developers such as microsoft and Borland
have devised frameworks of C++ classes that package related
functions together.
Wednesday, October 21, 2009
Performance
Windows 7 feels faster than Windows XP and Vista, but it turns out that's not always the case--sometimes, it's the slowest out of the three operating systems. CNET Labs tested four 32-bit Windows operating systems: Windows 7 RTM build 7600, Windows 7 Release Candidate build 7100, Windows Vista with Service Pack 2, and Windows XP SP3, all on an Inspiron Desktop 530 Mini Tower running an Intel Core 2 Duo Processor E4500 at 2.20 GHz, with a 128MB NVIDIA 8300 GS graphics card, 4GB of RAM, and two 320GB SATA 7,200rpm hard drives.
(Shorter bars indicate better performance)
(Longer bars indicate better performance)
As you can see in the chart, we found that Windows 7 RTM was the fastest to shutdown, and was tied with XP for iTunes encoding. However, it was slower than XP and Vista for both booting up cold by a bit more than 1 second, and slower than either of its predecessors in its Microsoft Office performance. After having used Windows 7 beta, RC, and now the RTM for more than six months combined, it still feels faster for us when launching programs, opening the control panel, and dragging icons, files, and folders around than XP. That's not to denigrate the value of the benchmarks, but keep in mind that the perception and reality might differ based on hardware and usage.
Tuesday, October 13, 2009
OneNote 2007
While there have been numerous note taking tools available nothing, comes close to OneNote 2007 in terms of features it offers. The intuitive interface helps in organising your thoughts in a clear and concise fashion.
The Interface
Similar to real life notebooks, OneNote lets you create multiple Notebooks with separate sections, and each section can have multiple pages. For e.g. If you have many clients, you may create a Notebook called Client and add clients as separate section. Then each client section can have multiple pages containing client specific information. Notebooks are lined on the left hand side of the screen, Sections are lined on the top below the menu bar and the Pages are shown on the right hand side. The interface is simple to understand.
Screen Clippings
When taking down notes the ability to capture part of a web site or application saves lot of time and energy. OneNote lets you capture almost anything displayed on the screen using the screen clipping function. For example you can capture a section of the map showing your house and send it to a friend as a guide. It can also be used when planning a trip, researching on Internet, Online shopping etc.
Irrespective of the application open you can use [Windows] + [S] to activate the screen clipping mode. Select the area to be clipped and the captured image will be saved to the unfiled notes in OneNote.
Internet Research
OneNote is a useful tool for gathering information from the Internet for later use. It works great because, you can be sure you will not lose this information even if the Web site changes. You can send the entire page or some selected data to OneNote using the Send to OneNote button which appears on Internet Explorer. The gathered information will be pasted in the Unfiled Notes section. A hyperlink to the original source is also inserted at the bottom so that you can revisit the original site whenever you desire.
Text Recognition
OneNote has the ability to recognise text in pictures which are inserted as notes. For e.g. if you have taken a screen clipping of your online reservation ticket, it will be saved as an image. Now if you want to grab the text (seat Number, coach number etc) then simply right click on the image and select ‘Copy Text from Picture’ and paste the text next to the picture.
This feature can be put to good use for grabbing data from a visiting card, provided you have taken an image of it from your phone. Simply add the image as a note in any page and grab the text using the method described above.
Side Notes
If you are addicted to using Sticky Notes then you will love the Side Note feature. Side Note is used when you are working on a different application and want to quickly jot down some related information, for taking quick notes when on a phone or writing down your thoughts when reviewing some document.
There are two ways to quickly launch the Side Note window. Clicking on the OneNote icon in the system tray pops the Side Note window. Alternatively, pressing the combination of [Windows] + [N] has the same results.
Tables
Presenting data in tabular form has its own advantages and OneNote offers it too. Importantly, tables can be made using just the keyboard. Pressing TAB after any word creates a cell, pressing [Tab] again creates another, this way you can create an entire row consisting of data. On pressing [Enter], the cursor moves to the second line creating the second row of cells. To jump between cells [Tab] can be used. [Ctrl] + [Enter] + [E] or [R] can be used to insert a Row to the left or right of the cursor, [Ctrl] + [Enter] to insert a row below, and [Alt] + [Enter] to add one more line inside a cell.
Calculator
Need to do a basic arithmetic calculation when taking down notes? Well, OneNote can help you do that too. Let’s say, if you want to calculate 570 divided by 20, then just write down 570/20= and press [Spacebar]. The “=” sign is important, once you have written it simple press [Spacebar] and the answer will be calculated automatically. Even Complex mathematics such as Sin(30) and Squareroot functions can also be derived.
Attaching Files To Notes
OneNote allows storing of documents and other files directly on a page. This comes handy when you want to organise all your project related material in one place. You can add files in two ways. First, click on Insert à Files, and in the browser box which opens, select the files to add. The less geeky way of doing it is by dragging the required document and dropping it on to the OneNote page.
Full Page View
During brainstorming sessions, when you are taking down lots of notes expanding the view to full screen comes handy. In OneNote the Full Page View button placed next to Help menu is one way of doing it, or you can simply press [F11].
Thursday, October 8, 2009
One of the first and easiest methods is to password protect the entire sheet or workbook. To do this in Microsoft Excel 2007, first go to the Review tab and then click on Protect Sheet or Protect Workbook.
When a pop-up window appears, select your options and type in the desired password. Your password can be something crazy, that no one would ever suspect (like 45pQ93S21!). In order to remember your password, copy it into a different workbook for safe keeping.
Create a new file, just to store your passwords. You can name this file anything you want, but it would probably be safer to name it something mundane – like HistoricalStockPrices.xls – instead of something that screams “open me” like ListOfMyPasswords.xls. In this new file, create your password list that you can then refer to whenever you want to open a document.
Next, password protect the entire workbook. To do this, click on File, then Save As. When the file-save window appears, type in your file name, then select the Tools drop down menu. From that menu, select General Options.
This will enable you to password protect the entire workbook and prevent anyone else from opening it and viewing its contents. For this password – remember to use one that you will remember. There is no easy way to retrieve a lost Excel password, so make this one something unique that you won’t forget.
Now, whenever you want to open that file, you will first see a screen like the one below asking for your password. This will enable you to protect all of your passwords and never forget them.
Useful Tip: Creating a password file can be especially useful if you are required to frequently change your password at work and always have trouble remembering the new password.
Summary of Simple Steps To Protect Your Work
1. Protect your sheets using the “Protect Workbook” button and a crazy password that can’t easily be guessed.
2. Store all your passwords in one sheet so that you’ll remember them. Password protect the entire sheet when you save it by using the Tools – General Options functionality. For this password, use something that you will remember.
Wednesday, October 7, 2009
12 Hidden Windows Vista Network Tools
Windows Vista delivers an impressive line up of network tools that can be used to keep the operating system connectivity on a short leash. The total of 12 command-line tools can be used to manage all aspects of Vista networking. Users will be able not only to closely monitor the networking activity of the platform, but also repair network connections. The utilities are not new to Windows Vista, having survived in the operating system from previous Windows versions. Here is the complete list in alphabetical order:
- getmac – this tool will enable you to display the MAC addresses for network adaptors on a system. The Media Access Control (MAC) address for the network card can be accessed both on the local computer and on a network.
- hostname – not sure about what the name of your machine is on the network? Just type hostname and hit enter.
- ipconfig – according to Microsoft’s own description, the tool is designed to display by default only the IP address, subnet mask and gateway for each adapter associated with the TCP/IP. But in addition to enumerating the TCP/IP network configuration parameters users can also refresh the DHCP and DNS settings.
- nslookup – is meant to be used according to Domain Name System.
- net – is a general tool with commands covering a broad range of functionality.
- netstat – displays protocol statistics and TCP/IP network connections.
- netsh – the command-line tool enables Vista users to both view and alter the network configuration settings of computers.
- pathping – is a middle solution which bundles the functionality delivered by traceroute and ping.
- nbtstat – a tool that will display protocol statistics and current TCP/IP connections using NetBIOS over TCP/IP.
- Ping – a complete description of the ping utility can be found here.
- route – manipulates network routing tables.
- tracert – users can implement this command-line tool to identify connectivity problems between the local computer and a network address.
When using command-line tools in Windows Vista it is healthy to remember to launch the command prompt window with administrative privileges. In order to do so, enter “cmd” in the Search box under the Vista Start Menu and press Ctrl + Shift + Enter to launch the process with elevated privileges.
How to install Windows Vista?
Step #1: Plan your installation
When you run the Windows Vista Setup program, you must provide information about how to install and configure the operating system. Thorough planning can make your installation of Windows Vista more efficient by helping you to avoid potential problems during installation. An understanding of the configuration options will also help to ensure that you have properly configured your system.
I won't go into that part right now (I might later this month, no promises...) but here are some of the most important things you should take into consideration when planning for your Windows Vista installation:
-
Check System Requirements
-
Check Hardware and Software Compatibility
-
Determine Disk Partitioning Options
-
Decide on a Workgroup or Domain Installation
-
Complete a Pre-Installation Checklist
After you made sure you can go on, start the installation process.
Step #2: Beginning the installation process
You can install Windows Vista in several methods - all are valid and good, it all depends upon your needs and your limitations. In this manual I will focus on the simplest form of installation - directly from the Windows Vista DVD media.
So, insert your Windows Vista DVD media into your DVD drive and reboot your computer. A black window will appear momentarily while the DVD content is read.Step #3: The GUI-based portion of the Setup program
Unlike previous versions of Windows, Windows Vista does not have a noticeable text phase of the setup process, and it will boot directly into the Graphical User Interface (GUI) mode.
-
After a few moments you will see the first prompt:
Press Next unless you want to change some regional settings for the installation process.
-
Press the Install now button.
-
After a short delay you're be prompted to enter your product key:
You can skip this part if you don't have the product key handy (read Install Windows Vista Without Supplying the Product Key for more info). However, if you do have a valid product key at that time (and you should have one, we're dealing with legal issues here), then by entering the right key the setup program knows which version of Vista to install.
If you skip it, you'll be prompted for a Vista version that matches your product key (the one you don't have handy at that moment):
-
You now have to accept the license terms:
-
Next you need to press the Custom (Advanced) installation type button:
The Upgrade button is disabled because this specific installation if performed on a new computer without any previous operating system on it.
-
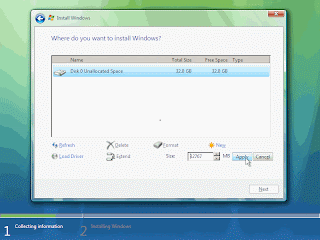
The next phase is to pick the installation partition. Since this computer has a new hard disk that hasn't been formatted before, you will only have the option to create a new partition on it. Had it had previous partitions on it you could have chosen to either delete them or perform other tasks. Pressing the Advanced button will bring up the following options.
Since we don't need to perform any additional task we will just press on the Next button. The installation process will then create a partition on all the available disk space, and format it.
-
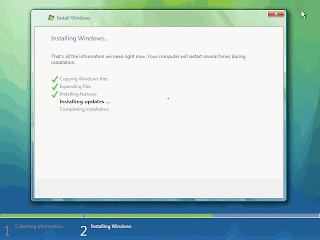
The setup process will now begin to copy files from the installation DVD media to the hard disk.
This will take some time:
-
After some time (the exact amount of time will greatly depend on your computer's hardware), the setup process will install updates for the operating system.
-
The computer will then automatically reboot.
-
Now comes a long waiting period, where the installation process configures the system. Again, the exact amount of time will greatly depend on your computer's hardware.
-
After the long wait, the system will then reboot once again.
-
You will think something went wrong because of the relative long time it take the system to display anything besides the black screen, but finally, after a few moments you will note a small colored circle:
-
A few seconds after that you will be prompted to enter a username and password for the first user on the computer.
Although the setup program will let you continue without entering a password, note that it is very advisable to enter a password here, and the best option would be to choose a complex password made of at least 7 characters or more (something like P@ssw0rd or MYpa$$w0rd). Make sure you remember it.
Also pick your user's display picture. This can be changed later.
-
Pick a name for your computer. The setup program will create one based upon the username you chose in the previous step, but you can change it now (and later).
Also pick a background for the user's desktop. This can be changed later.
-
Choose what sort of protection your computer gets. The recommended settings are best for someone that doesn't plan to hide their computer behind a corporate firewall (and even then, in some cases, this would be the best option). If you plan to install a 3rd-party firewall later you can opt to be prompted later.
Note that this setting will also have effect on how the computer uses the Microsoft Windows Update (Automatic Updates) features.
-
Next comes the Time Zone settings window. Choose your location.
-
Done! You're prompted with the last setup screen:
-
Again a long wait and some promotional screens you see the hourglass circling around, in preparation for the first logon.
-
Finally, the first screen appears, you're ready to rock and roll!